This article shows how to install Appserv which will setup Apache, MySQL, PHP, and phpMyAdmin within a single installation.
What is web server?
A web server is service that runs on a computer and allows other computers to download documents from it. This article provides step by step guide, how to install and configure a web server by using AppServ which will use Apache as a web server with PHP and MySql support, to help people who want to run own web server but lack skill to install and configure.
What is AppServ?
AppServ is an application that integrates Apache, PHP and MySQL and install them for you just in a few minutes. It is distributed under GNU/GPL License so it’s free.
Step 1: Get the file
At the time of writing this article, there are 2 version;
- 2.4.x contains PHP 4 and most software are older versions so it’s more stable.
- 2.5.x contains PHP 5 and most are newest releases at the official sites so it’s supports more function, but may less stable than 2.4.x.
It’s up to you to decide which is suitable for you.
- Get download by go to developer site.
- Or if you don’t want to go to the site, you can download 2.5.7 at here.
Step 2: Installation
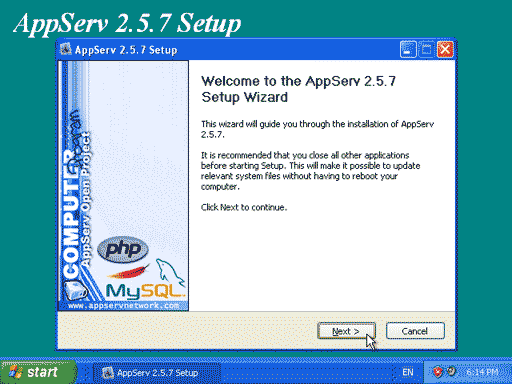
| 2.1 When you finished download, double-click the file. The welcome screen will be shown, click Next. |
 |
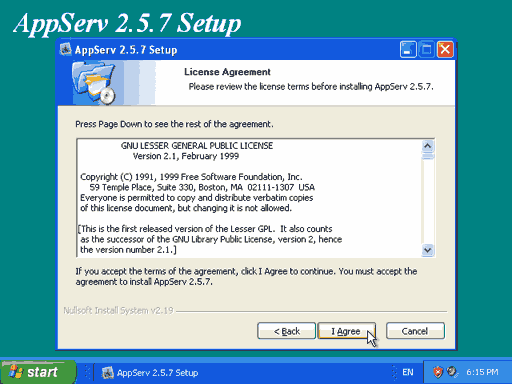
| 2.2 Click ‘I Agree’ to accept the license agreement. |
 |
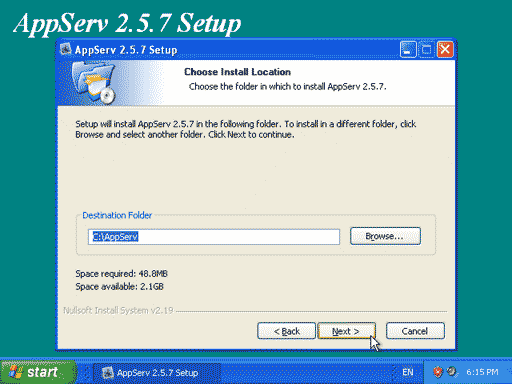
| 2.3 Choose the directory where you want to install AppServ, I use the default one. click Next. |
 |
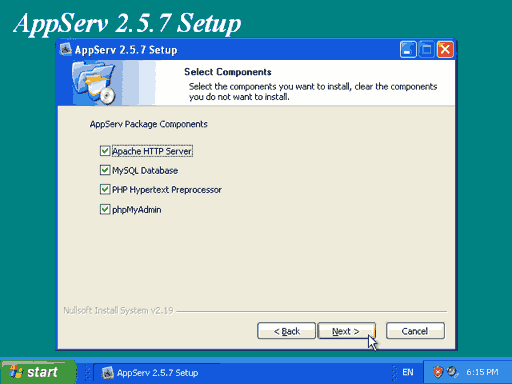
| 2.4 Choose the components to install, click Next. |
 |
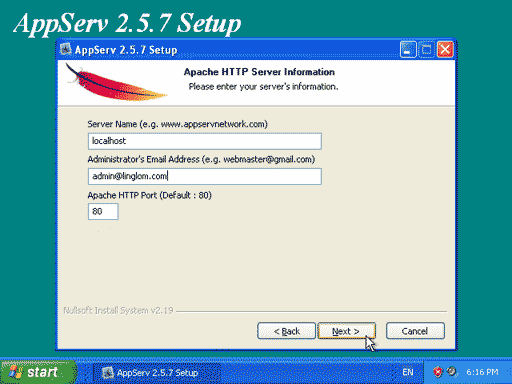
| 2.5 This is apache configuration. The server name use ‘localhost’ so you can access at http://localhost. Specify admin’s e-mail and port for apache. (recommend to leave 80 as it’s default) |
 |
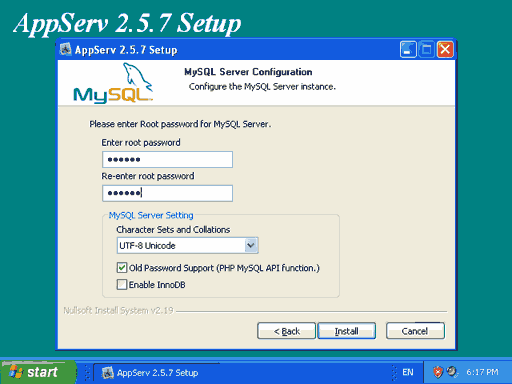
| 2.6 Now configure MySql, enter password for root account. Also, you can choose charset at here. Then click Install. The installation will start. |
 |
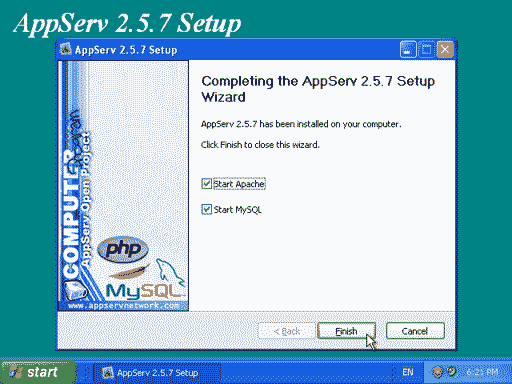
| 2.7 Now installation is finished, you can run Apache and MySql now by click Finish or if you want to run it later uncheck the box that you want. |
 |
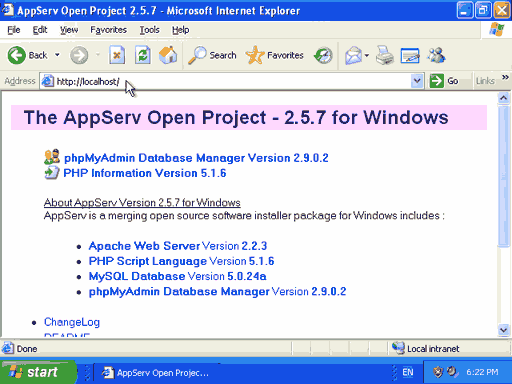
| 2.8 To verify that installation is complete, simply open http://localhost (or any server name that you provide while set up). The page will look similar this. |
 |
That’s it. Now you have your own web server just in few minutes.
Do you know maybe what is the difference between that appserv and apache server that you need to configure everything and it takes like 15mins to do that?
AppServ is the package contains Apache, PHP, MySQL and phpMyAdmin. It helps you to setup your web server faster and simpler. There is no differences if you install each of these software by yourself one-by-one.
Also, there is another one that similar to AppServ. It is XAMPP. It includes the Apache web server, MySQL, PHP, Perl, a FTP server and phpMyAdmin. You can find it at sourceforge.net
Thanks for the short tutorial. I have a question though. Which is better, AppServ or XAMPP? Thanks.
Hi Tony,
I’m not sure about XAMPP. I haven’t try it much. I think AppServ is OK for me and no need to try others.
I’ve installed AppServ but when I go to localhost/ i only get a blank page.Any Suggestions?
Hi, Wobby.
I’ve never seen any error after installation. But I want you to try access the web server by using your computer name, like this, http://your-computer-name.
Or try to access the web server with other browser such as Firefox, Opera, etc.
Or try check Windows event log to see if there is any error message about the installation.
Or try to reinstall the application again.
hmm…i’ve never had this problem again before also…i will install again
thanks 4 d tutorial. newbie here, now, how do i upload my own website to the server? u know, the index.html… thanks
Hi, Henyongadik01
Using ftp software such as FileZilla, you can upload files to server. But you need an FTP account to login to the server.
hi linglom, how to protect my directories by accessing other users becoz my ftp has no password i want to put a password how can i do that?i try installing html password protect but im not satisfied because the sub directories can open directly. Html password protect only the main domain, hoping for your immediate reply, im using windows base appserv…
Hi, Dave
You should be able to configure password from your FTP server. The step may vary depends on which software (FTP server) that you are using.
hi, linglom. how do yo do?
i have some problem to configure php on appserv. maybe u can help me. how to turn off display error and register global. i need that things off in order to install joomla. thx
Hi, Jimmy Adrian
To configure these settings, you have to edit php.ini file. By default, it located on C:\WINDOWS\SYSTEM32 folder. Open the file with notepad and search for “display_errors” and set to display_errors = Off. Next, search for “register_globals” and set to
register_globals = Off.
Then, save the file and restart the Apache service.
Hi I installed appserv and entered localhost and i got in with proplames but when i tried doing it using my ip ip address i couldn’t get in
Ok i tried fixing problems 4 times and reinstalled alot. it still wont work. i type ion local host and says localhost was not set up to establish with www.
and i even did the error message fix and register global fix and it still doesnt work. and last but not least i tried to manual start apache and said it was unable to bind too 0.0.0.0. what does this mean?
Hi, Nick
It could be that other application may use the current port (80 is the default). For example, IIS.
The solution is that change the port that apache is using. Edit httpd.conf file and change the text below from
to
Then, start the apache service again. And try to access the server like this:
http://localhost:8080/
http://your-server-name:8080/
thankyou sorry for late response lol and as soon as my computer is fixed ill be glad to try it!
how to run two local host at the same time(tomcat and AppServ).
virtual machine 😉
Hi.
Now, I can open server on localhost.
How to connect this server from other computer?
สวัสดีคับ น่าจาเป็นคนไทยใช่มั้ยคับ ^^
คืà¸à¸œà¸¡à¸ªà¸£à¹‰à¸²à¸‡à¹€à¸§à¹‡à¸šà¹€à¸žà¸ˆà¹€à¸ªà¸£à¹‡à¸ˆà¸ªà¸´à¹‰à¸™à¸«à¸¡à¸”à¹à¸¥à¹‰à¸§à¸„ับ บนlocalhost
à¹à¸¥à¹‰à¸§à¸œà¸¡à¸à¸¢à¸²à¸à¸ˆà¸°à¹ƒà¸«à¹‰à¸„นà¸à¸·à¹ˆà¸™(เครื่à¸à¸‡à¸à¸·à¹ˆà¸™) สามารถเข้าเว็บขà¸à¸‡à¸œà¸¡à¹„ด้ ต้à¸à¸‡à¸—ำà¸à¸¢à¹ˆà¸²à¸‡à¹„รบ้างคับ
Hi,
It depends on your environment configuration. If you have static IP address, people from the Internet can access your webpage from http://your-static-ip-address.
Otherwise, you may consider using dynamic DNS service, for example, no-ip.com, to map your dynamic IP address with some name.
You may also have to check your firewall configuration to allow incoming connection on port 80 (for HTTP protocol).
If you have any further question, you can contact me using the form on contact page.
I set up appserv 2.5.9 in window server 2008. at first time it working well. but when we use and use for few connections,it error phpmyadmin.
How can i do it?
thanks
hi linglom,
i’ve already install appserv and it working well. but when it comes to install joomla i’ve found that it has problem with MySQL or apache or something.because when i browse localhost/myjoomla it doesnt appear the installation of joomla. Fyi, ‘myjoomla’ is same name as well as my folder in c:\appserve\www\myjoomla. please help
โหมด mod_rewrite มันคืà¸à¸à¸°à¹„à¸à¹ˆà¸°à¸„ับ ผมมืà¸à¹ƒà¸«à¸¡à¹ˆà¸¡à¸²à¸à¹€à¸¥à¸¢à¸„ับ à¹à¸¥à¹‰à¸§à¸—ำà¸à¸²à¸£chmode เป็น 777 ทำยังไงคับ à¹à¸¥à¹‰à¸§ restart acphae ใหมทำไงà¸à¸µà¸à¸¥à¹ˆà¸°à¸„ับ งงมาà¸à¸ˆà¸£à¸´à¸‡ ๆ คับ à¹à¸¥à¸°à¹€à¸¡à¸·à¹ˆà¸à¸—ำà¸à¸²à¸£ restart acphae ใหม à¹à¸¥à¹‰à¸§à¸ˆà¸°à¸ªà¸²à¸¡à¸²à¸£à¸–เข้าหน้เพจที่เราสร้างได้เลยหรืà¸à¹€à¸›à¸¥à¹ˆà¸²à¸„รับ โดยคลิà¸à¸ˆà¸²à¸à¸«à¸™à¹‰à¸²à¹€à¸žà¸ˆà¹€à¸¥à¸¢à¹ƒà¸Šà¹ˆà¹„หมครับ ต้à¸à¸‡à¸‚à¸à¹‚ทษจิง ๆ ครับที่ถามเยà¸à¸°à¸¡à¸²à¸ เพราะไม่รู้จริง ๆ คับ à¹à¸•à¹ˆà¸ªà¸™à¹ƒà¸ˆà¸¡à¸²à¸à¹à¸¥à¸°à¸•à¹‰à¸à¸‡à¸‚à¸à¸šà¸„ุณ พี่ ๆ มาà¸à¹€à¸¥à¸¢à¸™à¸°à¸„รับที่à¸à¸£à¸¸à¸“าเสียสละเวลามาตà¸à¸šà¸„ำถามผม เà¸à¸£à¸‡à¹ƒà¸ˆà¸ˆà¸±à¸‡ สนับสนุนนะครับพี่ ๆ เวปพี่ดีครับ สู้ ๆ ครับ
hi linglom
i have similar issue with nick, i have setup a website on windows 2012 server ,im followed all the step mention above,but if i type my website example http://www.domain.com on any internet browser ,it cant open…i have to type http://www.domain.com:8080 on the browser then it load normally,i have allready opened port 8080 on my firewall ..is there any tips so i dont have to type the port number?
Thank you
Hi Anton,
It’s probably that the server is configured to use port 8080. When you install the program, on step 2.5, you can choose port number for web access.
You can also change port number in httpd.conf (after installation). The default path is “C:\AppServ\Apache24\conf\httpd.conf”. And modify these settings (without quotes):
– “Listen 8080” to “Listen 80”
– “ServerName localhost:8080” to “ServerName localhost:80”
Then, restart Apache service. If port 80 is available, it should work fine.
Crazy Question:
How can we start, stop and restart the service of appserv on window?.
You can start/stop services on Windows by follow these steps:
1. Press Windows + R to open Run window.
2. Type services.msc and press Enter.
3. On Services, if you want to restart Apache service, search for apache24 (where 24 is your Apache version). If you want to restart MySQL service, search for the name start with mysql.
4. Right-click on the service and select Restart. Or stop/start the service as you want.