- Change MAC Address in Windows, Part 1: Introduction
- Change MAC Address in Windows, Part 2: Feature on NIC
- Change MAC Address in Windows, Part 3: Windows Registry
This post shows how to change MAC Address in Windows by edit Windows Registry. Before you read this post, I suggest you to read “Part 1: Introduction” first. Also, if you haven’t try to change MAC Address by using feature on a NIC, I recommend to try it before on “Part 2: Feature on NIC”. If you have tried the first method and not succeed, it’s time to use this method to change MAC Address by modify the Windows Registry. It is best practice to backup the Windows Registry before modify it.
Note: Changing MAC Address in Windows by this method is not supported by Microsoft. I’ll not be responsible on any damage or loss on your system. Do on your own risk!
Step-by-step to change MAC Address by Windows registry
- Before start, I’ll show the current MAC Address. It is 00-21-85-08-45-65.

- Open command prompt by click Start -> Run -> type “cmd” -> Press Enter. Then, type command below to list all NICs on the current computer.
net config rdr
In this example, there are 3 NICs (on red mark). The NIC that I want to change MAC Address is the first one which I have observed by the MAC Address at the end of each line. Then, I have to note down the string in the bracket {}, the easiest way is to copy and paste to the Notepad. In this example, I have noted the string {F2B0CA68-D2F5-4907-938E-DD338B60A8A0}.

- Next, open Registry Editor by type the command below:
regedt32
Note: You can also use “regedit.exe”. For more information about these tools, read Differences between Regedit.exe and Regedt32.exe on Microsoft KB.

- On Registry Editor, navigate to HKEY_LOCAL_MACHINE -> SYSTEM -> CurrentControlSet -> Control -> Class ->
{4D36E972-E325-11CE-BFC1-08002bE10318}.

- You see lots of sub-folders in {4D36E972-E325-11CE-BFC1-08002bE10318} with 00xx format, for instance 0001,0002,0003, etc. Now I have to compare the value of NetCfgInstanceId on each of these sub-folders with the value that I have noted down on step 2. In this example, I have found the match on 0001 sub-folder. Normally, you should find the match on 0000 sub-folder.

- Next, check if the key “NetworkAddress” is existed on the sub-folder in step 5 or not. If not, create a new key by right-click on the sub-folder -> New -> String Value. If there is already the key, goes to step 8.

- Set name as “NetworkAddress”.
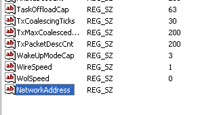
- Double-click on the key NetworkAddress and assign MAC Addresss as you desire. In this example, I set to 0021850845AA.
Note: Enter the MAC Address without dash (-), dot (.), semi-colon (:).

- The configuration will look similar to the figure below.

- Open Network Connection by Start -> Settings -> Control Panel -> Network Connections. Disable the Network Connection by right-click and select Disabled.

- Enable the Network Connection by right-click and select Enabled.

- Observe the Network Connection again. Now the MAC Address has been changed to 00-21-85-08-45-AA.

- To change the MAC Address value back to the original (the built-in value), simply remove out the value that you have set on step 8 and restart the network connection again.


If my computer already has a MAC address where is it stored and how do I change that? Why do I have to create a new key? I guess what I am asking is how does the original MAC address work? Just because I create a key in the registry why does my computer want to use that rather than the original MAC address?