- Getting started with Microsoft ISA Server 2006, Part 1: Introduction
- Getting started with Microsoft ISA Server 2006, Part 2: Environment Setup
- Getting started with Microsoft ISA Server 2006, Part 3: Installation
- Getting started with Microsoft ISA Server 2006, Part 4: Service Pack 1
- Getting started with Microsoft ISA Server 2006, Part 5: Network Layout Concept
- Getting started with Microsoft ISA Server 2006, Part 6: Configure Network Layout
- Getting started with Microsoft ISA Server 2006, Part 7: Create DNS Lookup Rule
- Getting started with Microsoft ISA Server 2006, Part 8: Create Web Access Rule
- Getting started with Microsoft ISA Server 2006, Part 9: Client Configuration
- Getting started with Microsoft ISA Server 2006, Part 10: Logging
- Getting started with Microsoft ISA Server 2006, Part 11: HTTP Filtering
- Getting started with Microsoft ISA Server 2006, Part 12: Block Windows Live Messenger
Client Configuration
From Part 8: Create Sample Access Rule, you have created an access rule on ISA Server 2006. Now, it is time to configure client computer. There are three types of client that you can choose: SecureNAT, Firewall client and Web Proxy. Each type has a different features, see the table below for the comparison.
On this example, I configure the client computer as firewall client type. But you will see how to configure all types of client.
Section
Client Types
The table below compares the ISA Server clients.
| Feature Client types | SecureNAT client | Firewall client | Web Proxy client |
|---|---|---|---|
| Installation required | No, but some network configuration changes may be required | Yes | No, Web browser configuration required |
| Operating system support | Any operating system that supports Transmission Control Protocol/Internet Protocol (TCP/IP) | Only Windows platforms | All platforms, but by way of Web application |
| Protocol support | Application filters for multiple connection protocols required | All Winsock applications | Hypertext Transfer Protocol (HTTP), Secure HTTP (HTTPS), File Transfer Protocol (FTP), and Gopher |
| User-level authentication | No | Yes | Yes |
| Server applications | No configuration or installation required | Configuration file required | Not applicable |
SecureNAT client
- To configure client as SecureNAT client type, set the default gateway of the network interface card on client to the ISA Server.

- If you are using DHCP, you can configure by add Router scope option to the ISA Server.

Firewall client
- Download Firewall Client for ISA Server from Microsoft.
- Install Microsoft Firewall Client on the client computer.

- On ISA Server Computer Selection, select Connect to this ISA Server computer and type the ISA Server host name.

- After the installation completes, you will see the firewall client’s icon on the task bar.

- You can view and modify configuration by double-click on the icon and select Settings tab. Also, you can click on Apply Default Settings Now for other users on this computer can use this configuration.

Web Proxy client
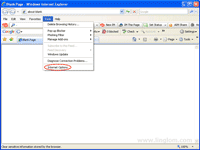
- Open your web browser. On this example, I use Internet Explorer.
- On Menu bar, Click on Tools -> Internet Options.

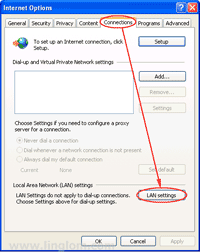
- On Internet Options, Select Connections tab and click on LAN settings.

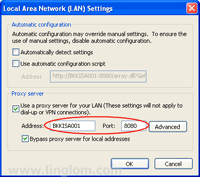
- On Local Area Network (LAN) Settings, check the box Use a proxy server for your LAN and type the ISA Server address and port.

What’s Next
Now I have done the basic configuration on both ISA Server 2006 and the client computer. Next, it is time to test accessing the Internet from the client through the ISA Server.
Hi
I’ve only used ISA2000 that came with SBS and didn’t have any problem.
I’ve just installed sbs2003 and the clients can connect to the internet and internal network fine, but when I’ve added ISA2006 none of the clients can access the server or internet, uninstall isa2006 and they’re fine.
I assume I’m missing a firewall policy to allow access to the internal network? I’d have thought it would have been already open, but I’m new to this.
Any advice? SBS2003 with ISA2006 installed 2 nic’s
Regards
Mark
Hi, Mark Lewis
By default, ISA Server will block any traffic so you must create an access rule to allow certain traffic. See Getting started with Microsoft ISA Server 2006, Part 8: Create Web Access Rule for an example how to create an access rule.