Remote Desktop Connection is one useful tool of Windows which allows you to manage remote servers so you don’t have to go to in front of each server and do your tasks. This feature saves lot of time and effort of IT staff. But on the Internet, the firewall or security devices may block this kind of traffic (TCP port 3389). So it would be great if we can remote desktop through web (HTTP) which is a common protocol. This comes to Remote Desktop Web Connection.
Note: This article is works on Windows XP and Windows Server 2003 as terminal servers.The Remote Desktop Web Connection is the Remote Desktop Connection client packaged as an ActiveX control that can be embedded in a Web page to provide access to a Terminal Server or a computer running Windows XP Professional or Windows Server 2003 with Remote Desktop enabled. Remote Desktop Web Connection provides most of the same functionality as the Remote Desktop Connection software; but it does not require a private network, or virtual private network connection.
Requirement
- On the server side, you need Internet Information Server 4.0 or later. Windows XP and Windows Server 2003 already have this component but first it must be installed from Add/Remove Programs
- On the client side, it can be run on Windows platform with Internet Explorer 4 or later with enable ActiveX.
Section
- Enable Remote Desktop Connection on Terminal Server
- Install Remote Desktop Web Connection
- Test Connection
Step-by-step to enable Remote Desktop Web Connection
Enable Remote Desktop Connection on Terminal Server
- On Terminal Server, open System Properties. You can do this by open Control Panel -> System.

- Or right-click on My Computer, select Properties.

- On System Properties, click on Remote tab. Verify that the Enable Remote Desktop on this computer is checked. This will allow remote desktop connection from remote computer to this computer.
Note: You can allow specific user to connect to this server remotely by click on Select Remote Users. By default, Administrator is already has access.

Install Remote Desktop Web Connection
- This section requires Windows CD when you installing components.
- Open Add or Remove Programs from Control Panel.

- Click on Add/Remove Windows Components on the left side.

- On Windows Components Wizard:
For Windows Server 2003, double-click on Application Server -> Internet Information Services (IIS) -> World Wide Web Service. Then, check on Remote Desktop Web Connection.
For Windows XP, double-click on Internet Information Services (IIS) -> World Wide Web Service. Then, check on Remote Desktop Web Connection.
Note: You’ll see that other components which required by this tool are checked automatically.

- Click OK until you back to the first page of Windows Components Wizard, click Next to install the selected components.
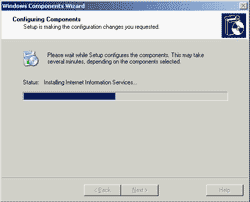
- Now, you’ve finished set up Remote Desktop Web Connection.
Test Connection
- On client, open Internet Explorer and navigate to “http://computername/tsweb” where computername is the terminal server’s computer name.
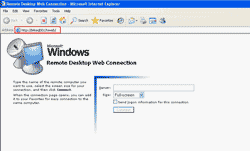
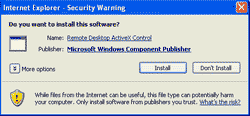
- It requires you to install Remote Desktop ActiveX Control. Click Install.
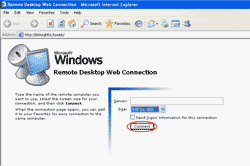
- Now try to connect to the terminal server, change resolution size as you want and click Connect.
Note: You don’t need to specify the server name since you’ve just connected to the terminal server (in the URL).
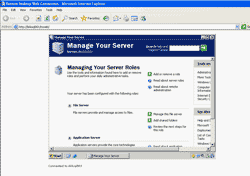
- You’ll see desktop of the terminal server in the Internel Explorer.
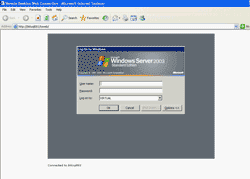
- You can perform any tasks as the Remote Desktop Connection.
great tip !
the only thing is that i noticed is when you use remote TSE from WAN: the fisrt connexion is done with HTTP but after the connexion is done with TCP 3389.( not really helpfull when the firewall block TSE port).
You can redirect the port in IIS so that it isnt using 3389. Then in your browser type the same URL: whatever port you used. I.e. http://computername/tsweb:5000
hello
My sql server 2005 is on a local machine (windows 2003 server),
I want to access it through Web Application.
Thank You
Waiting for reply
Hi, Manish M M
Have you followed the instruction on this post?
I have done the steps over and over and they don’t work for remote desktop web connection. My home desktop is actually the host and I have my laptop at work as the client. I can’t seem to get the laptop to connect and have tried all the seemingly simple steps. The wizard never asks for the Windows XP professional disc, and says it is installed, but I can’t connect, and when I search my computer for “Remote Desktop Web Connection” it is not there. I have been trying to set this up for the past week every day, getting nowhere.
Hi, Ali
Have you try at your home to connect from the laptop to the desktop?
If you want to connect to your home desktop through the Internet, you need to have an static IP address for the home desktop. Or you can use dynamic DNS service such as http://www.no-ip.com/.
This worked like a charm! I read other posts that missed the part about NOT putting a server name in the login screen and had lots of trouble connecting. Leaving it blank….worked!!! Thanks Linglom!
Thanks for putting the actual location of the installation. They are buried several layers deep inside windows components.
Great post in regards to enabling Remote Desktop Web Connection on Windows. In addition to above steps, one can even use remote support tools such as logmeinrescue, gosupportnow, GoToMyPC etc. or can even deploy on premise remote support appliance such as RHUB or Bomgar appliances in order to remotely access computers from anywhere.