- BizTalk Training 1 – Basic Send/Receive XML Message
- BizTalk Training 2 – Receive/Send Plain Text
- BizTalk Training 3 – Customize Filename Dynamically
- BizTalk Training 4 – Using Functiods in Map
- BizTalk Training 5 – Using FTP Adapter
Basic Send/Receive XML Message
This tutorial shows how to create simple orchestration to send/receive xml messages using FILE Adapter.
There are 5 tutorials in this training.
- BizTalk Training 1 – basic send/receive xml message
- BizTalk Training 2 – receive/send plain text
- BizTalk Training 3 – customize filename dynamically
- BizTalk Training 4 – using Functiods in Map
- BizTalk Training 5 – using FTP Adapter
Objectives
- Learn how to create schema from sample xml file.
- Learn how to send/receive xml message using FILE adapter.
- Learn how to deploy BizTalk project to BizTalk Administration.
Topics
- Add new orchestration.
- Create schema.
- Create new Message.
- Create logical ports.
- Deploy the project.
- Configure BizTalk Administration.
Step-by-step
Suppose that I want BizTalk to process xml message from folder A (C:\FILE1\IN\*.xml) to folder B (C:\FILE1\OUT\%SourceFileName%). The sample data of xml message is in C:\FILE1\person1.xml.
<person> <name>Mr. A</name> <position>Sales Manager</position> <salary>10000</salary> </person> |
- Add new orchestration.
- New BizTalk Project named ‘BizTalkTraining’.

- Add New Item.

- Select new orchestration to the project named as ‘Orchestration1.odx’.

- On Orchestration1, drag Receive
 and Send
  components to the orchestration.

- New BizTalk Project named ‘BizTalkTraining’.
- Create schema
- Now I need to create schema for receive and send component. If you don’t have schema file (.xsd file) that corresponds with xml message, you need either to create schema by using wizard to generate from xml message or create by yourself. By using wizard, it’s fast but it doesn’t work well if your xml message is too complex.
- Solution 1: using BizTalk Schema Generator
- To use this wizard, you need to enable it before use once by execute VBScript file that is in BizTalk SDK Utilities directory. If you installed BizTalk on default directory, the files should be in C:\Program Files\Microsoft BizTalk Server 2006\SDK\Utilities\Schema Generator\. If your document type is DTD, execute InstallDTD.vbs. If your document type is standard XML (Well-formed XML), execute InstallWFX.vbs. Or you can execute both files.

- Back to the orchestration, in solution explorer. Select Add Generated Items.

- Select Generate Schemas on left side and select Generate Schemas on right side. Click Add.

- On document type, select Well-Formed XML and select input file from sample xml message. Click OK.

- Wait for a while and you will see your schema has been created.

- You’ll need to clear target namespace because the sample file doesn’t have any target namespace by click on “Schema” and clear Target Namespace in Properties.

- Solution 2: create the schema manually
- In solution explorer, select Add New Items.

- Select Schema Files on left side and select Schema on right side. Also, named the schema as person1.xsd. Click Add.

- Now you’ll see empty schema file. You can add new element by right click on root node -> select Insert Schema Node -> Child Field Element.

- Try to create element as the same in sample xml message. Also, you can change data type in properties window.

- You’ll need to clear target namespace because the sample file doesn’t have any target namespace by click on “Schema” and clear Target Namespace in Properties.
- Change name of the root to Person and now you’ll get the schema for incoming message.

- Create new Message
- On orchestration1, move to Orchestration View. Right click on Messages and select New Message.

- Highlight on Message_1, change Identifier to msgPerson and select Message Type as schema that you’ve created in 5). (Schema -> BizTalkTraining.person1)

- Change Message on receive and send components in the orchestration1 to msgPerson.

- Create logical ports
- You have configured to receive msgPerson and send out msgPerson. Next you need to create logical ports to receive and send these messages from/to.
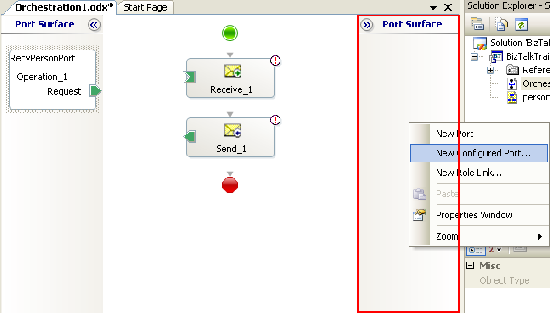
- Create receive port.
- Right click on Port Surface area (red rectangular) and select New Configured Port.

- Click Next. Named the port as RecvPersonPort. Click Next.

- Configure Port Type.
Name Port Type Name as ‘RecvPersonPortType’. Leave Create a new Port Type, Communication Pattern as One-Way and Access Restrictions as Internal selected. Click Next.

- Configure Port Binding.
- Ensure that “I’ll always be receiving messages on this port.” is selected.
- Select Port binding as “Specify now”.
- Select Transport as “FILE”.
- Type URI: as path with file mask that you want to receive. In this sample, it is “C:\FILE1\IN\*.xml”. That means to read any .xml file in C:\FILE1\IN.
- Select Receive pipeline as XMLReceive.
- Click Next and Finish.

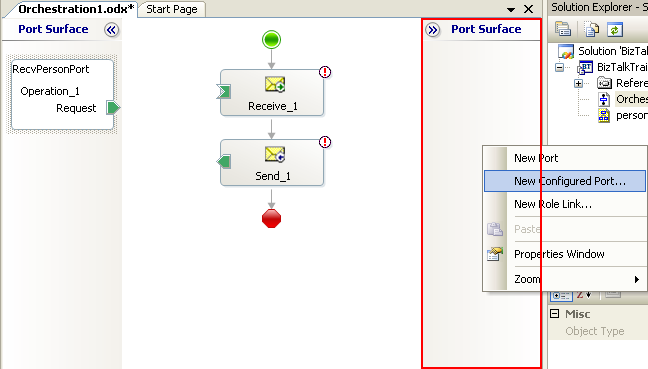
- Right click on Port Surface area (red rectangular) and select New Configured Port.
- Create send port.
- Right click on Port Surface area (red rectangular) and select New Configured Port.
- Click Next. Named the port as SendPersonPort. Click Next.

- Configure Port Type.
Name Port Type Name as ‘SendPersonPortType’. Leave Create a new Port Type, Communication Pattern as One-Way and Access Restrictions as Internal selected. Click Next.

- Configure Port Binding.
- Ensure that “I’ll always be sending messages on this port.” is selected.
- Select Port binding as “Specify now”.
- Select Transport as “FILE”.
- Type URI: as path to destination file that you want to send. In this sample, it is “C:\FILE1\OUT\%SourceFileName%”.
Note: %SourceFileName% is the mask that means using file name as it was receive. - Select Send pipeline as XMLTransmit.
- Click Next and Finish.

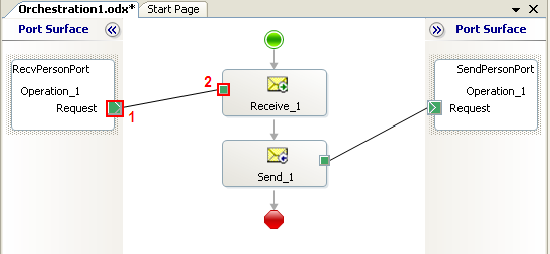
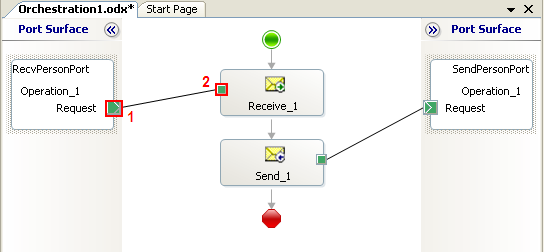
- Now you have configured logical ports to map with physical paths. Next is to connect logical ports to receive and send components that you have created previously. Drag green button on RecvPersonPort (1) to green button on Receive_1 component (2). Also, repeat this on send port.
- Deploy the project
- Click on Receive_1 component and change Activate to “True” in the properties.

- We have finished on the orchestration. Next, we are going to deploy the project on BizTalk Administration. On the solution explorer, right click on Solution ‘BizTalkTraining’ and select Properties.

- On Solution Property Pages
- Select Configuration in Configuration Properties.
- Change Configuration to Deployment.
- Ensure that Deploy has been checked.
- Click OK.

- Next create strong name key and assign to the project
- Open Visual Studio 2005 Command Prompt by select on Programs.

- Type in the command prompt ‘sn -k c:\FILE1\BizTalkTraining.snk’. Then the key will be created in c:\FILE1.

- Back to the BizTalkTraining project, right click on BizTalkTraining and select Properties.

- On Property Pages
- Select Assembly in Common Properties.
- Find Assembly Key File. Click … to browse.
- Select file that you have just created “BizTalkTraining.snk”.
- Click Open and OK.

- To change name of the application when deployed, select Deployment in Configuration Properties.
- On Application Name, change to “BizTalkTraining”.
- Click OK.

- Open Visual Studio 2005 Command Prompt by select on Programs.
- Now you’re ready to deploy the project to BizTalk Administration. Right click on Solution ‘BizTalkTraining’ and select Deploy Solution.

- You’ll see in output window if the deploy was succeeded.

- Configure BizTalk Administration
- Open BizTalk Administration; expand BizTalk Server 2006 Administration -> BizTalk Group -> Applications. You’ll see BizTalk Training was deployed to here. Right click on BizTalkTraining and click configure.

- On Configure Application window, select Host to BizTalkServerApplication. Click OK.

- Now you can start your application, but you need to create folder as you have already configured in Visual Studio. For receive folder, C:\FILE1\IN. For send folder, C:\FILE1\OUT.
- Right click BizTalkTraining again; click start to start BizTalk application.

- Click Start again.

- Now BizTalkTraining application is running, you can test your application by copy person1.xml (sample xml file) to receive folder (C:\FILE1\IN). If the application is configured correctly, the file will be moved to send folder (C:\FILE1\OUT) with the same name as in receive folder.
- Result in C:\FILE1\OUT\Person1.xml.


Resources
You can download the example source code (zip file) at here.
The zip file contains
- BizTalkTraining folder which is the example project on Visual Studio 2005.
- FILE1 folder which contains IN and OUT empty sub folders for test receive and send message, BizTalkTraining.snk which is a strong name key file used in the example project and person1.xml which is an example xml message.
- binding.xml file which is a configuration file for import in BizTalk Administration.
Hi
do you have an example of how to setup MSMQT? i am trying to recieve massages from MSMQ to the orchestra
regards,
Arik
Beautifully explained. I followed the steps and I did not get any error and it works like charm. Thanks for the excellent example.
Hi,
I followed all the steps for developing Orchestration and everything worked fine. I started the application. I copied the person1.xml file from your zip file to c:\FILE1\IN and there is nothing seen in my C:\FILE1\OUT. Please let me know the troubleshooting process so that i can follow that.
Hi, Sudha Rajkumar
Is the file on IN folder is gone? Is there any error message? You can check the error message on BizTalk Administration or application event log of Windows.
Hi,
I have got the message in the OUT folder. I have configured it wrongly intially. Now its working finr.
Thanks,
Sudha
Hi,
I followed the steps, and deployed successfully. The project appeared in admin console. But when I started the project, the XML file is not transferring from ‘IN’ folder to ‘OUT’ folder.
What can be the reason. Please help me.
Regards…
Hi, Smitha
Does the file in “IN” folder is gone when you put it in there? I suggest you check the Application event log if there is any error.
Hi
EXCELLENT,BUT PLEASE EXPLAIN EVERY STEP(WHAT WE HAVE TO SELECT THAT ONLY YOU ARE MENTIONING WHY WE WILL USE THAT ONE YOU ARE NOT GIVING EXPLANATION.DO YOU HAVE AN EXAMPLE OF HOW TO SETUP SQL ADAPTER ?
regards,
KOTIREDDY
Hi, kotireddy
Setting up SQL adapter is a bit complex. I was thinking to write one but I was gave up. I recommend you find a book about BizTalk should be better than read on blog post.
Hi, First of all thanks for explaining with every detail. I followed all the steps but xml file is not transffered from In folder to Out folder. Application is started and configured properly. I checked the Eveng Log, there is no error.
Hi, Priya
Does the BizTalk service is running? If the file is still in ‘In’ folder after 10 – 20 seconds, there is something wrong. Did you put the file in the correct path as define on BizTalk?
There was a failure executing the receive pipeline: “BizTalkTraining.ReceivePersonPipeline, BizTalkTraining, Version=1.0.0.0, Culture=neutral, PublicKeyToken=403d31dd5713b7a7” Source: “Unknown ” Receive Port: “BizTalkTraining_1.0.0.0_BizTalkTraining.Orchestration1_RecvPersonPort_403d31dd5713b7a7” URI: “D:\Biztalk\training-2\IN\*.txt” Reason: Failed to get pipeline: BizTalkTraining.ReceivePersonPipeline, BizTalkTraining, Version=1.0.0.0, Culture=neutral, PublicKeyToken=403d31dd5713b7a7. Please verify that the pipeline strong name is correct and that the pipeline assembly is in the GAC.
Hi Linglom
many thanks for your training documents. Great work!
I had to reassign the Receive Ports Folder using BizTalk Application – Configure – Receive Ports and Locations – Properties… – Configure… and then on File Transport Properies Browse for Receive Folder and define file mask (*.xml); the same for Send Ports and Send Port Groups.
After that the XML file made it’s way as expected.
Thanks & best wishes
Jost
hi there great post we have going there.
Hi, Each body
I’m new here.I I will appreciate your help.
Regards
pls, can anyone help me?
i deployed the application application successfully. When i put the xml file into the IN folder, it automatically gets hide properly. But, when i open the OUT folder, NOTHING is there (person1.xml file is not there)… What i should do?
please give me any suggestion…
Sudha Rajkumar got the same problem. But she corrected herself. i dont know how..
Link Building is the main foundation of SEO. Even if your website has great content and it’s very informative, unless the site follows Google’s Quality Guidelines, it won’t rank in SERPS and get any traffic. Getting these links can be a very tedious and time consuming task.
highest pagerank
this tutorial is a godsend….as someone completely new to biztalk, i was feeling rather lost in the product documentation but this lesson shines the light of day on the subject….thank you!!!
can you provide the same detail for the biztalk server 2010? i have face to proble for configure it nothing can i confogure i use the sql managment studion r2 and biztalk server 2010 and also microsoft visual studio 2010.i can no configure any thing in it so please help me if you can ..
thnx from
Vimal Bhavsar
Great example! One question: the xml file that this example reads has only one person. What if i want to pass to biztalk many person items, instead of one? how can i read this information? i have tried to do this and it takes the info from the first person, but ignores the rest of the data.
Thanks in advance
Paola
Hi …
it was really helpfull..thnk u
is xsd , schema is necessary to send and receive xml files via biztalk??